Showing posts with label Craft. Show all posts

Tuesday, 7 May 2013

Secret Garden Splendour


I received a pretty parcel in the post recently from a dear friend of mine Vera from
She loves to surprise me with pretty scrap booking supplies from her business

I was super happy when the postman handed me the box and I took a peek inside.
Aunty Vera knows me very well.
She knew that I would be squealing with delight.

I thought you would all love to take a peek too !

These gorgeous papers are from the 'Secret Garden' collection.
She has lots in stock right now so pop over and tell her that you are a friend of mine. She is a real sweetheart and she will look after you.

I had something special in mind to make with them when I saw them. I decided to make some pretty gift tags to attach to my flower orders for Mothers Day.
They are so pretty and soft and Mums would love them.
Well this Mum (me) loves them especially !

These are my tags complete !
I love the one on top the best because I LOVE Forget-me nots
Didn't I get spoilt !
Lucky me :-)

You will find these papers HERE

I love to make things when special occasions arise. There is nothing nicer then a home made card to say 'I love you Mum'
and then I made something quite neutral and brown into the perfect greeting for my tea cup posies.
They are quick and easy to make and allow my blooms to be the star and not the card.
They may be boring brown but they look really effective don't you think ?
a dab of hot glue stuck my little flags on to a simple skewer. 
Simple but just right.

              no it's not your eyes..........this next pic IS blury.
                                     But you get the idea of where my little flags ended up !

and the birthday girl was very happy when I delivered her little teacup full of happiness. It is such a gift in itself to hand somebody flowers and seeing their face light up.


Thursday, 16 February 2012

THURSDAY FLOWERS, TUTORIAL .......Shabby Chic Pretty Florists/Gardeners Tool Kit Belt


 FRENCH BLUE AND PEACHY PINK

                        'Thursday Flowers'
As many of you know I have recently gone back to school.  I have decided to follow my life long love of flowers and study Floristry.
I am loving the course and thought I would share my journey with you.     
                                           SO
each Thursday I will share my weekly floral arrangement, share a useful flower tip or simply share photographs with you all.

My very first 'Thursday Flowers' brings you a very simple tutorial to make a florists or gardeners tool kit. 

Forgive me for no measurements as I made this late one night but really measurements can be made up as required


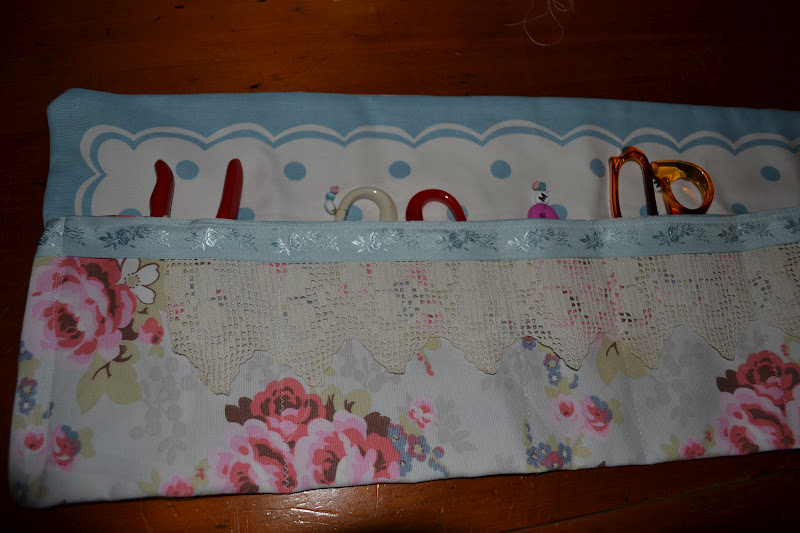
I began my Florists tool kit with 2 very pretty 'Cath Kidston' tea towels. A sweet friend of mine had recently given them to me as a gift. They were way too pretty to use as tea towels so when we were asked at my course to make a tool kit roll I knew exactly what I would use those pretty towels for.

1. Simply turn the 2 tea towels pretty sides facing together. 
2. Pin them together along the hem line to keep them held firmly in place.
3. Stitch along 3 sides (leaving 1 side end open).
4.Turn the tea towels inside out so that the right sides are now facing outward.
5. Stitch up the open end as close to the edge as possible.
6.Lay your tea towel creation flat in front of you.  Fold the bottom upwards towards the desired point. Make sure you leave enough room to safely keep your tools tucked away neatly. Remember to allow enough room for them to poke out of the top so you can distinguish each tool.
I chose to save enough room at the top of my pouch to be able to fold the top section down to keep my tools safely in place.
7. I used trim to pretty things up.  I used antique lace and vintage ribbon to trim. If you prefer it plain and simple then don't embellish at all. If however you wish to add the trim, remember to stitch it on before you sew the sections into place.
8. I worked out how many tools that I would need to hold in my kit and divided up the tea towel pouch into sections.  I required 5 sections and each tool required different sized space so I stitched along to my own requirements.


As you can see, my tool kit can be either folded in half twice over OR  simply rolled up.  I cut a length of ribbon to tie up my pretty little bundle to keep it safely together.  
If you choose to use your pouch for gardening and wish to wear it around your waist then simply add some strong binding and stitch it all across the top end of your pouch . Leave adequate length on your binding to allow a bow at the back for strength. Measure your waist for correct length requirements.


and this stunning lady was my very first flower I had the pleasure of playing with in my class. Isn't she beautiful ? What better way to begin my floral career with than a stunning long stemmed white rose ! 

I hope you all enjoyed my first ever
 'THURSDAY FLOWERS' segment and I will look forward to sharing more with you next week.

Melanie
xo


Wednesday, 11 January 2012

Vintage Inspired Cushions....Crinoline Lady


Do you like them ?
Aren't they pretty !

A few days before Christmas a lovely friend of mine called up and asked if I was still sewing and if so what stock did I have available.
It had been a while since I had pulled my sewing machine out and whipped up anything.  After years of sewing up my original vintage inspired designs I had felt that I needed a break from it all.
I had sewn up a few things every now and again but just hadn't really been inspired to create anything much at all in the way of cushions.

This lovely friend of mine holds my same passion for the colour blue and wanted this to be the colour for the cushions she wanted to give as a gift. 

SO out came my never ending piles of trims, doilies and vintage lace and my spirit went crazy.  I stayed up late that night because I just couldn't rest until it was all done.  I loved what I had made and hoped that she would too.

The next day she arrived to take a look at what I had made and her original plan to buy something for her friend went out the window. 
She decided that these pretty cushions would indeed be making their new home on her own sofa.   I had to giggle !  She was thrilled to bits with them and all of a sudden I realised why I loved to sew.  It was the admiration and gratefulness that came back to me in bucket loads when I saw my hard work making somebody smile.


I shared some of my prettiest pieces with her. I had been saving up the crinoline ladies doily to make myself something special but knew that it would look perfect with the blue gingham ruffle that I made.

The thing that I love the best about using vintage and antique fabrics is often their imperfections.  They rarely come without a tiny moth nibble or an age stain. These imperfections are easily disguised by stitching pretty buttons or lace trims etc over the top.  Nothing is wasted and I love the fact that  old fabrics have new life breathed into them.


Monday, 10 October 2011

Shabby Chic Scrapbooking Memory Album


                 Scrap booking Journal Project

The most thoughtful gift in the world is one that has been hand crafted and given from the heart. A handmade gift says I love and care about you and I really wanted to spend the time making you something that would make you smile.

A close friend of mine was celebrating her birthday over the weekend and I really wanted to tell her how much I valued her friendship. I spent the entire day on Saturday in my pj's creating a beautiful scrap booking journal for her.
I had scrap booking papers, lace, ribbon and photographs everywhere and I managed to glue my fingers together with the hot glue gun at one point !
I think the end result was worth it when I saw the big smile on her face !  She adored it and I was thrilled.


Firstly I bought a journal style book to create my masterpiece with. It was covered in pretty blue linen and at first I planned on giving it to my friend just as is.  However as the day went on and the journal began to fill up with fabrics and laces and other bits and bobs I found the perfect sized doily and I decided to glue it on to the cover of the journal. Paper flowers were then hot glue gunned on to the front in a cluster in the corner. In keeping with the blue book I tried to keep the colour scheme in the same tone. I used sea greens, pale blues and a pretty peachy pink colour as a contrast. The creamy coloured lace tied it all together beautifully and gave it the antique look that I desired.

I used scrap booking papers, fabric scraps and lace lengths that I already had in my collection and just began to layer.  I began with a fabric or paper background, tore papers and let the end result of the tearing guide me to the eventual layout of the page.  If it didn't tear straight then it didn't really matter, lace or trims would follow the line of the paper and give it it's own signature look. Highly decorative antique buttons accented a tag with a message to my friend on it.  I wrote little verses and little messages all through the book and finished it off with a lovely letter to her reminding of how much she was valued by all of her special people in her life.

I like to think that when she is feeling down or in need of a smile ,she can pick up her special book and be reminded of how special she is.


I think the end result was simply stunning....I loved it and so did she !


Saturday, 30 July 2011

Shabby Chic Business Cards


French Blue and Peachy Pink wanted to make her own pretty business cards. 
I have always designed my own business cards and had them professionally printed. It is quick and easy and the end result is no fuss. 
Sometimes though I do make my own to handout personally. It's the small personal touches that make all the difference sometimes.

For my business cards I chose,

An assortment of all things french blue and peachy pink. I visited my local craft store and bought just the right shades of ribbon and teensy paper flowers. It was all quite inexpensive to buy, dollar stores have quite a great collection of trims etc.
All of my oval shaped cards were precut and store bought. I simply hot glue gunned a small piece of paper on top of the card, added my chosen ribbon and glued on the flower. I wrote my details on the front of the card with a fine tip brown antiquing pen, (I always find that brown is a lovely neutral colour to work with as black can look quite harsh against soft ,muted colours) 
I then gave each card a light spray with a great product called Glimmer Mist. Glimmer Mist is a very light glitter spray which softly adds just a soft glimmer of sparkle. I use it in scrapbooking and a special signature spray inside birthday cards. I found Glimmer Mist at http://www.auntyverascrapandcraft.com.au/ She has such pretty things in her online store.
Lastly I used tiny adhesive magnets to pop onto the back of the card.
These little cards are too pretty to throw away. A magnet offers the reciever of the card the opportunity to stick the card on to their fridge or magnetic message board.


So in a few easy steps I had created  little cards with my own signature pink and blue touch.
Simple, Easy and Very Pretty
xo


A hot glue gun, glue sticks, brown antiquing pen and Glimmermist glitter spray
were my tools of choice. A must for any craft cupboard.